| Version 17 (modified by , 16 years ago) ( diff ) |
|---|
Papywizard Tips and Tricks
Global usage
TODO
Geometry head setup
When the Merlin/Orion head is turned on, its internal electronic sets the position of both axis to zero. Be aware that in preset mode, the pitch axis positions assume that the zero is the position where the camera is horizontal; if it is not the case, zenith/nadir won't be real zenith/nadir.
In order to set a correct zero, you should first put the pitch axis so the camera is horizontal, using a bubble level in the flash connector, and then press the Home button, to tell Papywizard to use that position as origin.
Shooting sequence
(Only for hardware controlled shutters)
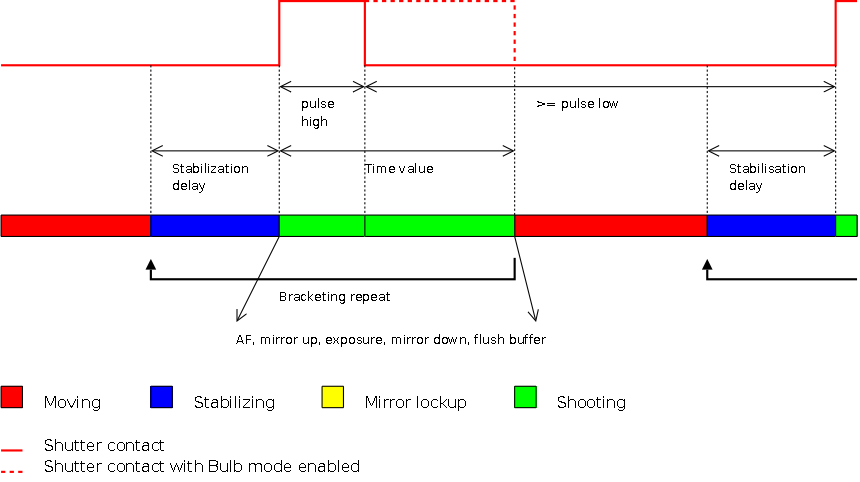
Without mirror lockup
- move to the requested position
- wait Stabilization delay sec
- trigger the camera shutter
- for Pulse Width high msec without Bulb mode
- for 'Time value sec with Bulb mode
- move to the next position
The Stabilization delay value mainly depends of the camera/lens weight, and the size of the tripod. Using heavy camera and small tripod will take longer to stabilize than light camera and strong tripod. In practice, 0.1 to 0.5 sec. should be enough.
The Time value param should be computed so that the entire shooting sequence can complete. This includes:
- AF cycle (not a good idea to use AF)
- time for mirror to lockup
- exposure time
- time for mirror to go down
- time for writing buffer image to card
The last 2 sequences can be included in the next move, but be sure that the camera is ready when the next shoot sequence begins!

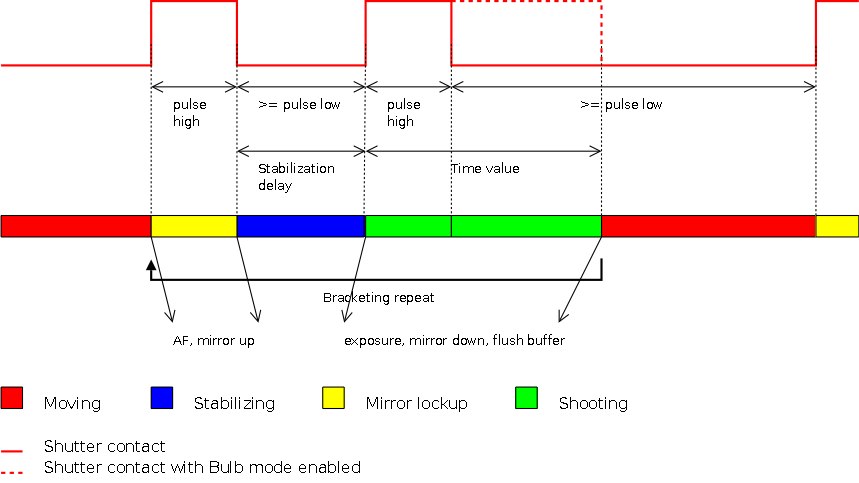
With mirror lockup
- move to the requested position
- trigger the camera shutter for Pulse Width high msec
- wait Stabilization delay sec
- trigger the camera shutter
- for Pulse Width high msec without Bulb mode
- for 'Time value sec with Bulb mode
- move to the next position
The Time value param should be computed so that the entire shooting sequence can complete. This includes:
- exposure time
- time for mirror to go down
- time for writing buffer image to card
The last 2 sequences can be included in the next move, but be sure that the camera is ready when the next shoot sequence begins!

Shooting direction
The default Papywizard scanning scheme is to shoot row by row, reverting the direction at each row (to avoid too much moves). But it is possible to configure it so it shoots column by column, and ask it to always ask it shooting from the begining of the row/column.
The best configuration mainly depends of the subject you are shooting. For example, if you have fast moving clouds, it is best to let the default configuration, to shoot the entire sky as fast as possible. But it also depends of the orientation of the head; if it is mounted on an horizontal pole, then choose column as first shooting direction.
Attachments (2)
- shutter_cycle_dev_w_lockup.png (19.8 KB ) - added by 16 years ago.
- shutter_cycle_dev_wo_lockup.png (17.2 KB ) - added by 16 years ago.
Download all attachments as: .zip
